中级实训总结报告
发表时间:2022-03-25来源:网络
目录【阅读时间:约30分钟】
中级实训总结报告姓名:隐藏敏感信息 学号:隐藏敏感信息一、阶段1:项目启动1、Vi/Vim2、Java3、Ant4、Junit5、SonarQube6、 编译运行BugRunner二、阶段2:基本任务1. part2的工作(1)CircleBug(2)SpiralBug(3)ZBug(4)DancingBug2. part3的工作1. Test for `act()`2. Test for `jump()`3. Test for `canJump()`4. Result3. part4的工作(1)ModifiedChameleonCritter(2)ChameleonKid(3)RockHound(4)BlusterCritter(5)(6)KingCrab4. part5的工作(1)SparseGridNode(2)SparseBoundedGrid(3)SparseBoundedGrid2(4)UnboundedGrid2(5)SparseGridRunner三、阶段3:扩展任务1. imagereader的工作2. imagereader的readme文件(1)ImagaReaderRunner.java(2)ImplementImageIO.java(3)ImplementImageProcessor.java(4)ImageProcessorTest.java3. mazebug的工作4. mazebug的readme文件(1)MazeBugRunner.java(2)MazeBug.java(3)Examples5. jigsaw的工作四、总结和心得体会中级实训总结报告
姓名:隐藏敏感信息 学号:隐藏敏感信息持续了五周的中级实训终于快结束啦,今天笔者来总结一下整个中级实训过程中的付出与收获。不妨回顾了一下中级实训的架构,可以说中级实训安排还算比较合理,从Vim+Java+Ant+Junit等工具的使用,到初步了解girdworld的架构和设计思想,再到自己手动完成girdworld的一部分代码,这一段时间是一个循序渐进的时期,对于不太熟悉整个软件开发流程的笔者而言,收获是非常大的。最后还有一个扩展任务,个人认为是基本任务的两倍难度,不过得益于网络资料和TA们的指导,笔者还是顺利地完成了三个扩展任务,可谓是很满足了~
此外,在检查阶段TA们也很尽心尽责,会询问各个阶段的代码以及其实现思想,也会指出代码存在哪些问题,再次感谢~
一、阶段1:项目启动
在阶段1,我们主要是围绕Vim+Java+Ant+Junit展开,具体流程可概括为:使用Vim来编写Java代码, 利用Ant实现Java代码的自动编译,利用Junit来进行单元测试。由于在阶段1并没有进行过多与gridworld相关的代码实现,此处就简述一下各个部分的学习心得吧。
1、Vi/Vim
Vim编译器是一款久负盛名的编译器,常常被称为“编译器之神”或“大神用的编译器”,它是linux中最经典的文本编辑器,支持代码补全、编译及错误跳转等功能。对于虽然不能说完全掌握Vim但也有几年使用经验的笔者来说,笔者更倾向于在CLI界面下使用Vim,比如实验室服务器往往就通过ssh连接linux terminal,这时使用Vim编辑器可以很好地编写各种代码。而在GUI界面下,笔者更倾向于使用sublime或eclipse来编写java代码,特别是后者在设置了熟悉的自动补全后,可以提升地提升工作效率。当然,在此次实训中笔者会尽量使用Vim来熟悉项目开发流程。
Vim编译器一共有命令模式、末行模式和编辑模式这三种工作模式,这三种模式的区别可以用以下一段话来概括。使用Vim打开文件时首先进入的就是命令模式,可以看做Vim编译器的入口,可以进行复制粘贴等操作;在命令模式按 i 便会进入编辑模式,可以进行各种代码或文字编辑操作,再按esc便会退回到命令模式;在命令模式按输入 : 进入末行模式,可以进行保存退出等操作。
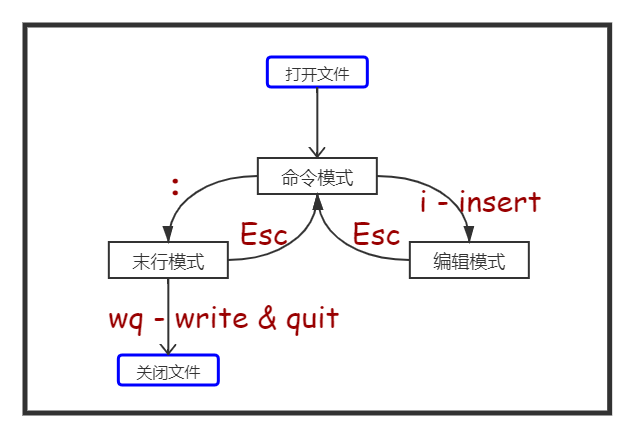
笔者常用的Vim指令有以下这些:
①打开文件:在terminal输入vim filename
②保存并退出:在末行模式输入wq
③复制一行代码:在命令行模式输入yy
④粘贴:在命令行模式输入p
⑤删除一行代码:在命令行模式输入dd
⑥撤销操作:在命令行模式输入u
⑦在编辑模式下:与文本编辑类似,方向键移动,正常键盘输入
2、Java
由于在大二时笔者已选修了Java语言开发的相关课程,因此在进行这部分的自学时比较轻松,主要是温故了Java的基本语法和使用命令行编译运行Java程序。
在笔者看来Java是是一门典型的面向对象编程语言,它尽可能地进行封装,拥有丰富的库函数与接口支持,对于协同开发效率很高,这也是Java常年位于编程语言排行榜前列的原因之一。Java程序的编写流程也不复杂,以熟悉的eclipse工具为例,主要流程是创建一个Java project,创建相应的package和class,然后写main函数与要调用的函数即可。此处便省略基础的Java语法介绍了,直接用一个简单的helloworld例子来说明如何使用命令行创建、编译并运行Java程序吧~~
首先创建并书写代码:
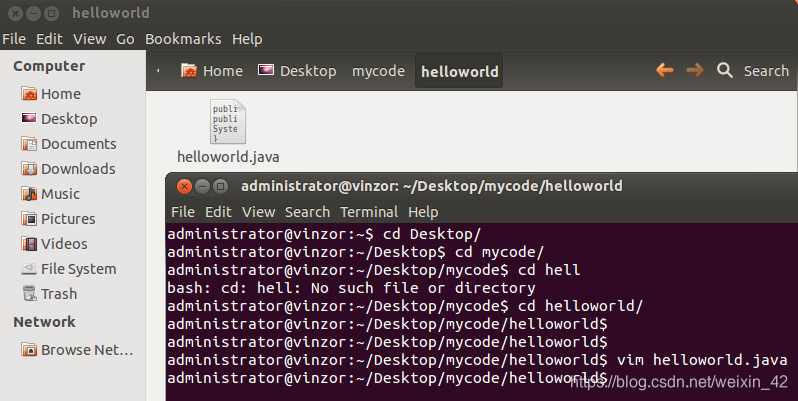
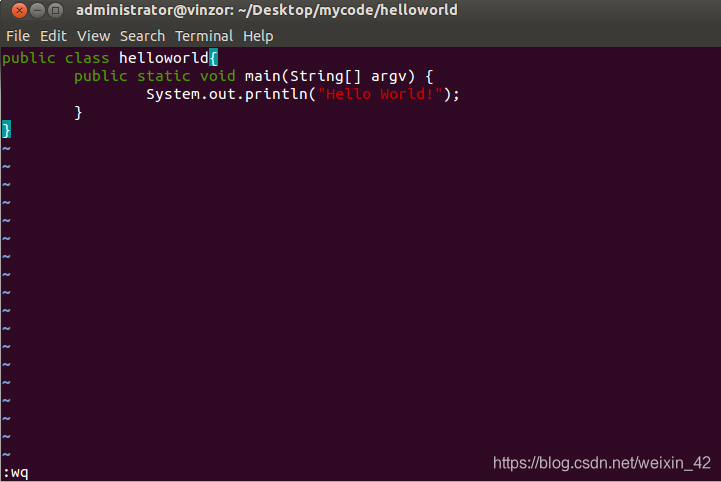
然后使用命令行编译运行Java程序:
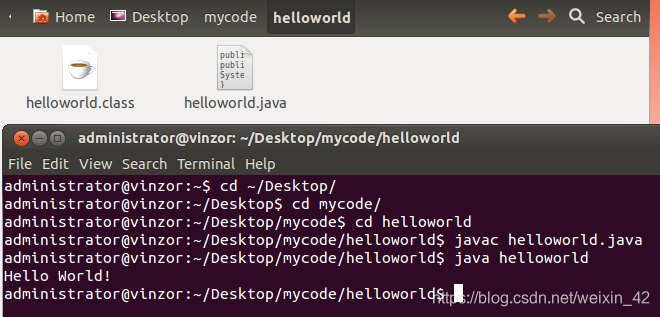
此外,虽然云桌面的环境变量已经配置了很多,但是直接执行java helloworld还是会报错: could not find or load main class helloworld 。
经搜索相关资料,是java的环境设置不完全,只要在 ~/ .bashrc和~/ .profile添加以下的环境变量设置即可:
进入 ~/.bashrc和~/.profile的指令如下: gedit ~/.bashrc gedit ~/.profile 要添加的环境变量如下: export JAVA_HOME=~/Desktop/java1.8 export JRE_HOME=${JAVA_HOME}/jre export CLASSPATH=.:${JAVA_HOME}/lib:${JRE_HOME}/lib export PATH=${JAVA_HOME}/bin:$PATH3、Ant
正如上文所述,Ant可用于实现Java代码的自动编译,Ant是一个将软件编译、测试、部署等步骤联系在一起加以自动化的一个工具,大多用于Java环境中的软件开发。根据笔者的自学体会,它的作用与C/C++的makefile类似,一次性编译多个文件,大大方便了项目编译的流程,能减少很多重复的操作。
Ant使用xml格式来编写,若要在项目中使用Ant,首先要在项目文件下面创建build.xml文件,并在xml文件中编写与项目相关的指令。编写完毕后,在项目文件下执行ant指令即可。
Ant中主要的元素有三种,分别是、和。
(1)project 元素是 Ant 构件文件的根元素, Ant 构件文件至少应该包含一个 project 元素,否则会发生错误。在每个 project 元素下,可包含多个 target 元素。 project 元素有如下属性:
①name 属性:用于指定 project 元素的名称
②default 属性:用于指定 project 默认执行时所执行的 target 的名称
③basedir 属性:用于指定基路径的位置。该属性没有指定时,使用 Ant 的构件文件的附目录
作为基准目录。
(2)target 元素是Ant 的基本执行单元,它可以包含一个或多个具体的任务。多个 target 可以存在相互依赖关系。target 元素有如下属性:
①name 属性:指定 target 元素的名称,这个属性在一个 project 元素中是唯一的。我们可以通过指定 target 元素的名称来指定某个 target
②depends 属性:用于描述 target 之间的依赖关系,若与多个 target 存在依赖关系时,需
要以“,”间隔。 Ant 会依照 depends 属性中 target 出现的顺序依次执行每个target。被依赖的 target 会先执行
③if 属性:用于验证指定的属性是否存在,若不存在,所在 target 将不会被执行
④unless 属性:该属性的功能与 if 属性的功能正好相反,它也用于验证指定的属性是否存在,若不存在,所在 target 将会被执行
⑤description 属性:该属性是关于 target 功能的简短描述和说明
(3)property 元素:该元素可看作参量或者参数的定义,类似于C/C++中的宏定义,可以用一些我们便于理解的变量名来代替复杂的路径,提高代码的可读性。
project 的属性可以通过 property元素来设定,也可在 Ant 之外设定。若要在外部引入某文件,例如 build.properties 文件,可以通过如下内容将其引入:
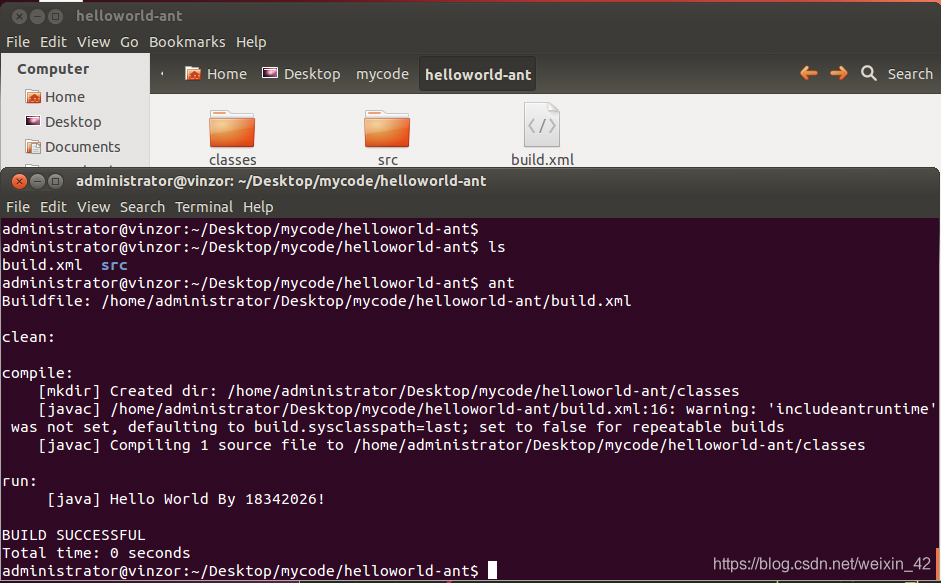
下面不妨借助【二、Java】中的helloworld代码,编写一个简单的build.xml来体验Ant工具。在项目目录helloworld-ant中,将helloworld.java放在src文件夹中,在项目目录下创建build.xml内容如下:
在项目目录下运行指令ant,即可自动编译并运行如下:
4、Junit
Junit是Java的一种单元测试框架,它所做的测试是白盒测试,常用于测试驱动开发(Test-Driven Development,简称TDD) 。由于之前选修的Java课程已接触过Junit框架,并且最近也通过Golang课程学习了TDD开发流程的思维,其实就是通过函数的输入输出来确定函数的正确性。
要使用Junit,需要配置好环境,并将junit的jar文件放到项目目录中。由于笔者查看的junit教程版本为junit 4.10,仍然以简单的helloworld程序为例,在项目目录helloworld-junit中,放入junit-4.10.jar、编写helloworld.java和Test_helloworld.java文件。
其中helloworld.java代码为:
public class helloworld{ public static void main(String[] argv) { System.out.println(sayhello()); } public static String sayhello() { return "Hello World By 18342026!"; } }Test_helloworld.java代码为:
import static org.junit.Assert.*; import org.junit.Test; public class Test_helloworld{ @Test public void test_helloworld() { String res = helloworld.sayhello(); assertEquals("Hello World By 18342026!", res); } }最后执行以下指令即可运行junit进行单元测试:
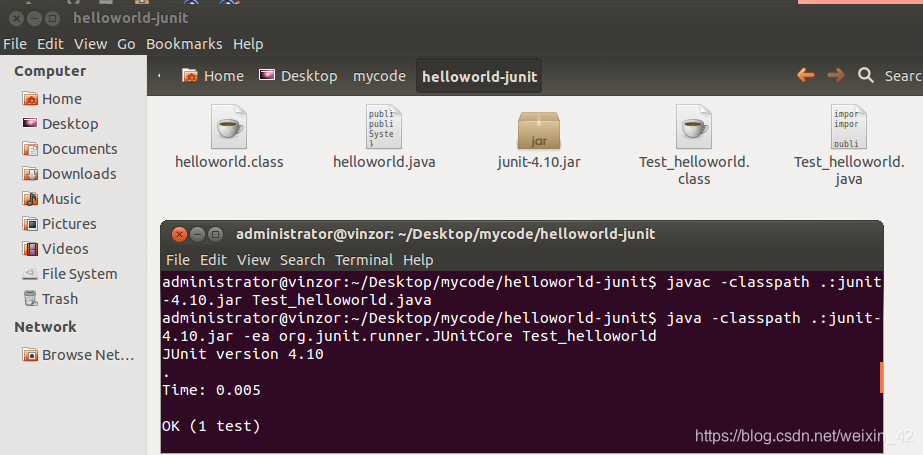
javac -classpath .:junit-4.10.jar Test_helloworld.java java -classpath .:junit-4.10.jar -ea org.junit.runner.JUnitCore Test_helloworld运行截图:
5、SonarQube
由于中级实训阶段一要用到SonarQube,虽然没有要求写相应的报告,但笔者感觉书写报告还是对提高软件的熟练度有帮助的。
Sonar 是一个用于代码质量管理的开源平台,用于管理源代码的质量,可以从七个维度检测代码质量。通过插件形式,可以支持包括 java,C#,C/C++,PL/SQL,Cobol,JavaScrip,Groovy 等等二十几种编程语言的代码质量管理与检测。
经检查,云桌面已配置好Sonar了:
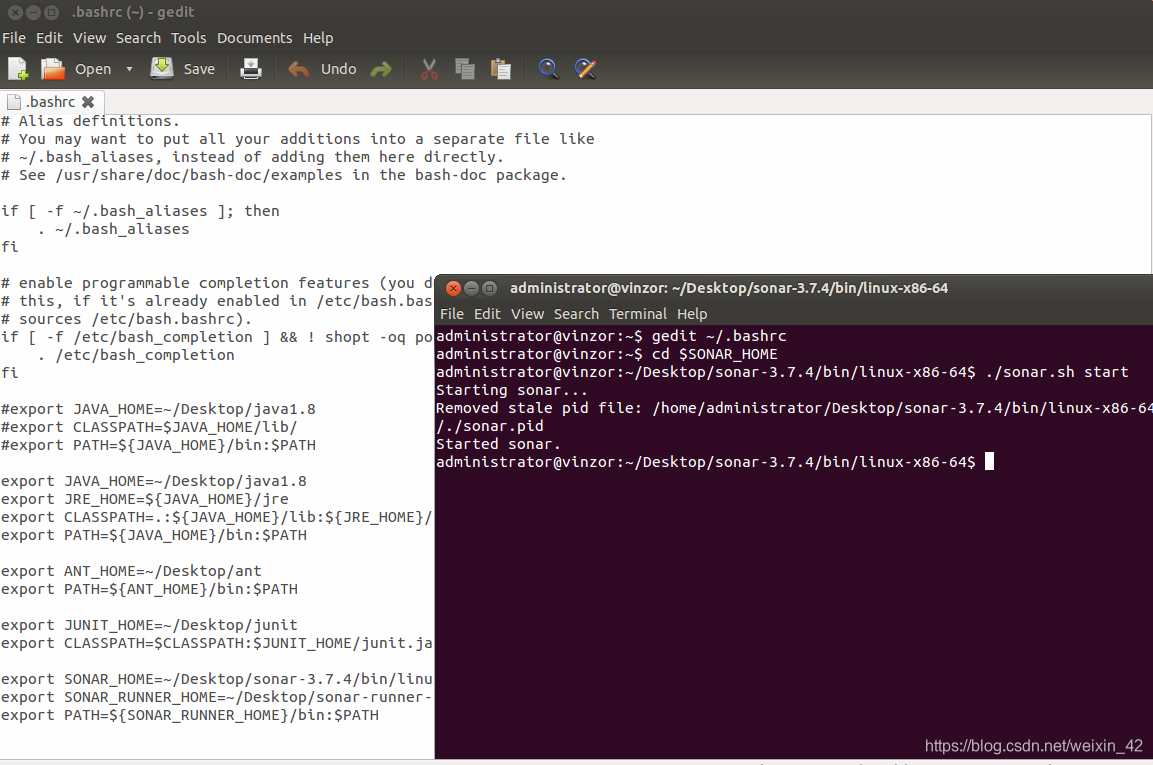
在 shell 里面键入 cd $SONAR_HOME, 可以直接进入启动目录。 在 shell 里面键入
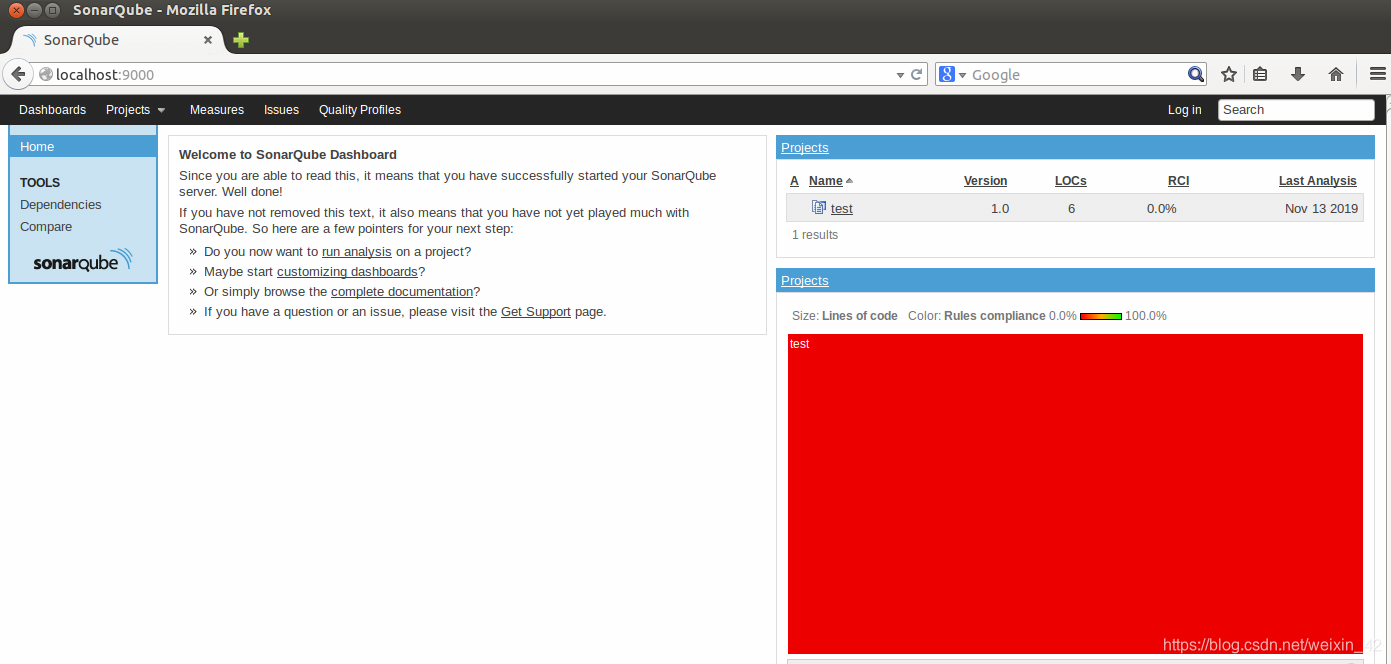
./sonar.sh start 启动服务 ./sonar.sh stop 停止服务 ./sonar.sh restart 重启服务访问 http:\localhost:9000, 如果显示 Sona输入rQube 的项目管理界面,表示安装成功:
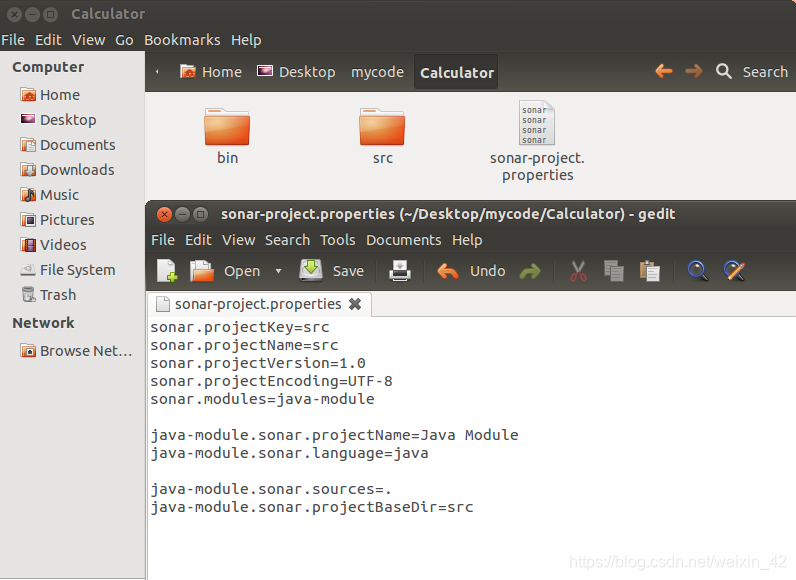
以阶段一的calculator程序为例,在项目目录下创建sonar-project.properties,其中只需要将sonar.projectKey、sonar.projectName和java-module.sonar.projectBaseDir的值修改为源码所在的文件夹即可,具体内容如下:
然后在当前目录下输入sonar-runner,再进入http:\localhost:9000查看程序的代码分析即可:
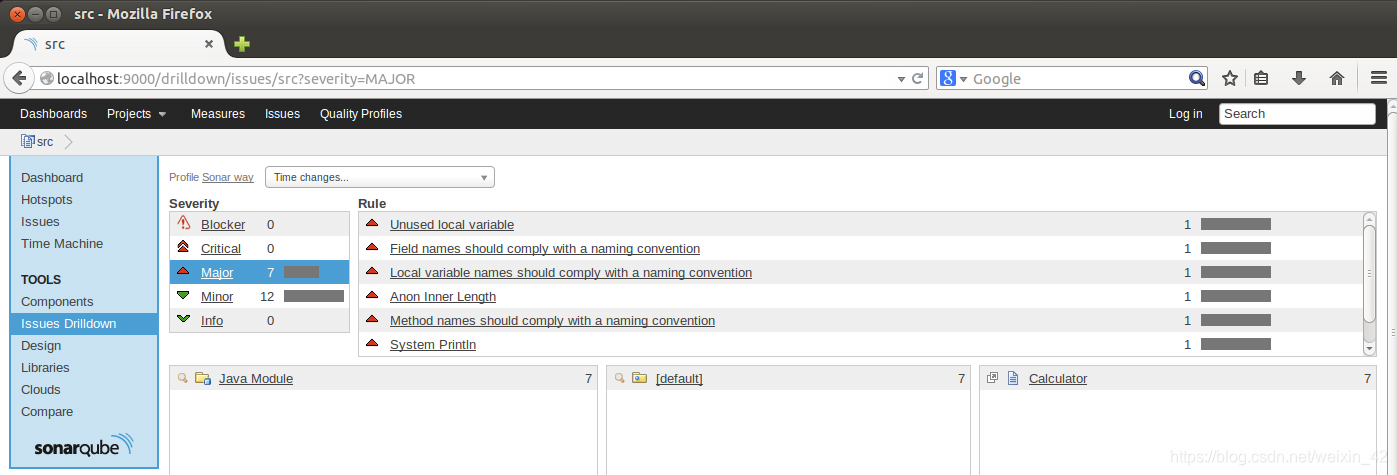
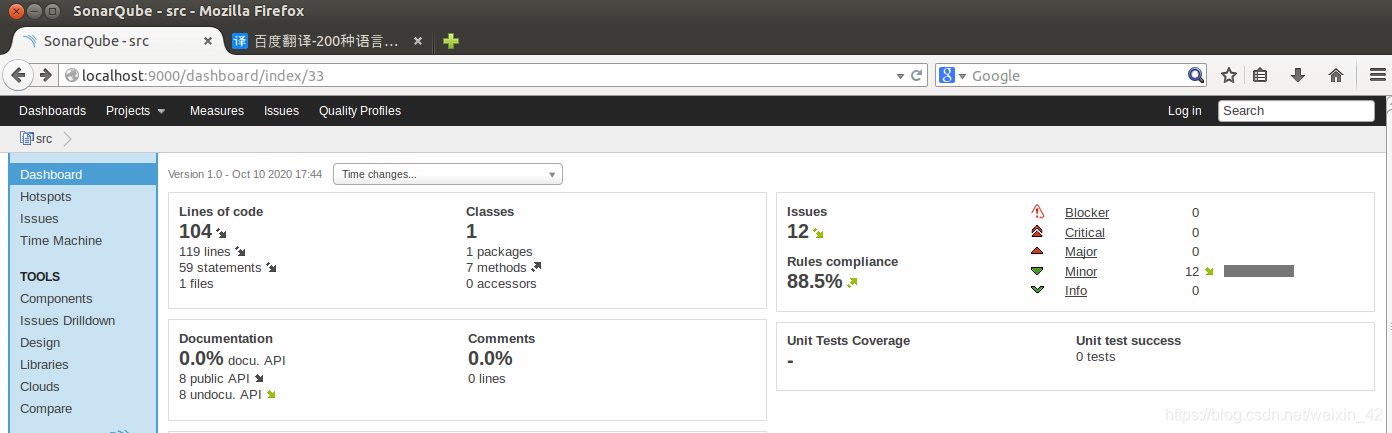
经过Major的提示修改后,学到了不少代码风格的知识,修改后如下:
6、 编译运行BugRunner
在仓库( https://github.com/se-2020/se-2020.github.io/tree/master/resources )中下载gridworld.zip并解压,再将里面的GridWorldCode.zip解压出来,进入目录GridWorldCode\projects\firstProject\中,即可看到BugRunner.java代码。
由于环境在之前已配置完毕,直接在当前目录下运行以下指令,即可进入BugRunner程序中:
javac -classpath .:./../../gridworld.jar BugRunner.java java -classpath .:./../../gridworld.jar BugRunner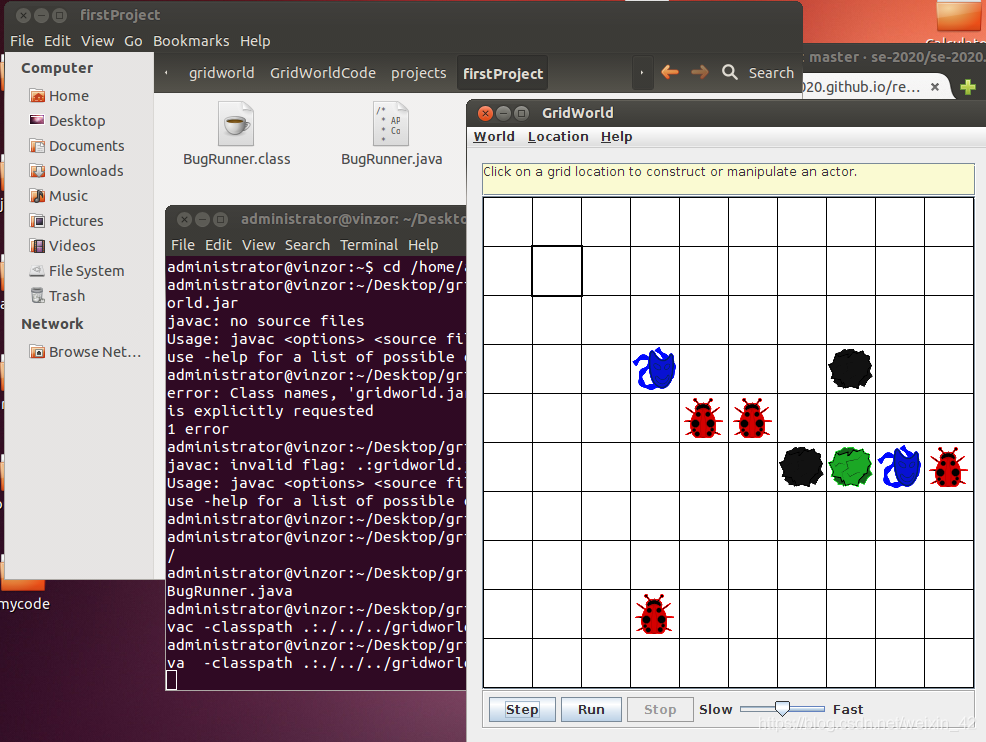
再来简单介绍一下BugRunner,首先用户可以自行在格子中放置可移动的虫子以及不可移动的花和石头,然后点击step是移动一步,点击run是自动开始移动多步,slow/fast的游标可以调节移动速度,stop则是停止。其他更详细的信息可看Part1的回答。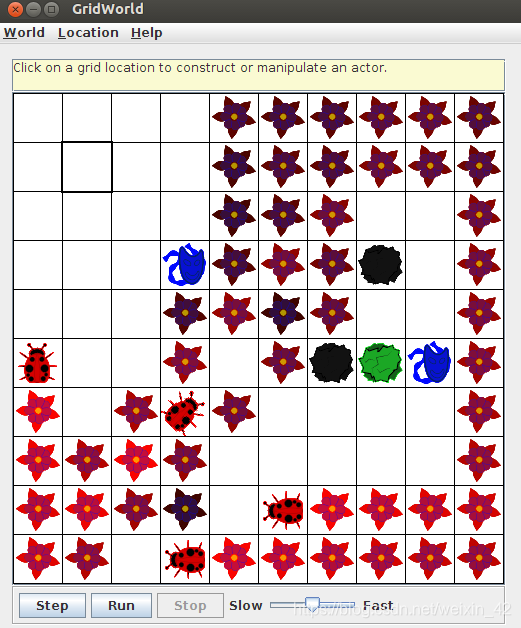
二、阶段2:基本任务
在阶段2,我们正式进入了gridworld的代码世界,从part2到part5,一共需要完成14个子模块的代码,代码量还是比较大的。不过由于在实训博客都给出了详细的设计介绍,并且还有相应的示例,所以往往在写完一个子模块的代码后,就能迁移至其他子模块,编写代码的速度也快了不少。此外,笔者还学习了如何写规范的readme文件便于其他人快速了解程序的使用,虽然阶段2的代码简单,但文档和sonnar-qube的修改等,还是花了笔者三四天的时间。
下面还是按照part2到part5来介绍一下这个阶段所做的工作(因为写了英文的readme,此处就直接引用啦):
1. part2的工作
This project can be run using Eclipse. Its introduction and running screenshots are listed below. We can also use Sonar-Qube for code analysis of project files.
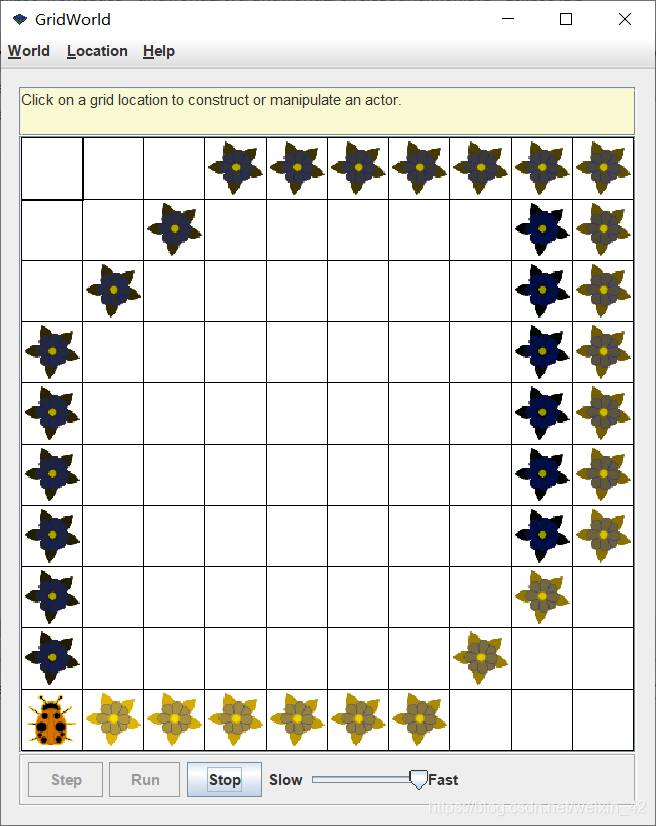
(1)CircleBug
Write a class CircleBug that is identical to BoxBug, except that in the act method the turn method is called once instead of twice.
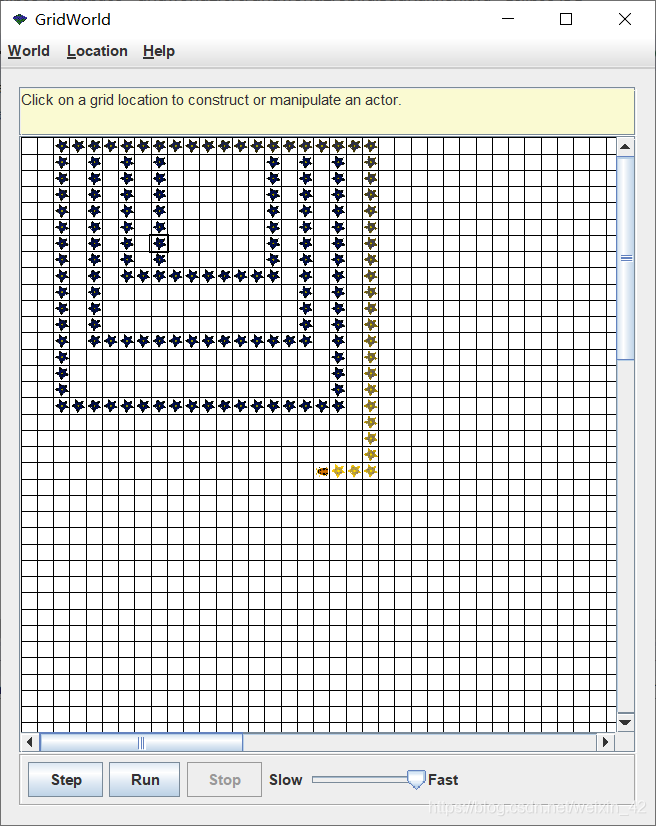
(2)SpiralBug
Write a class SpiralBug that drops flowers in a spiral pattern. Hint: Imitate BoxBug, but adjust the side length when the bug turns.
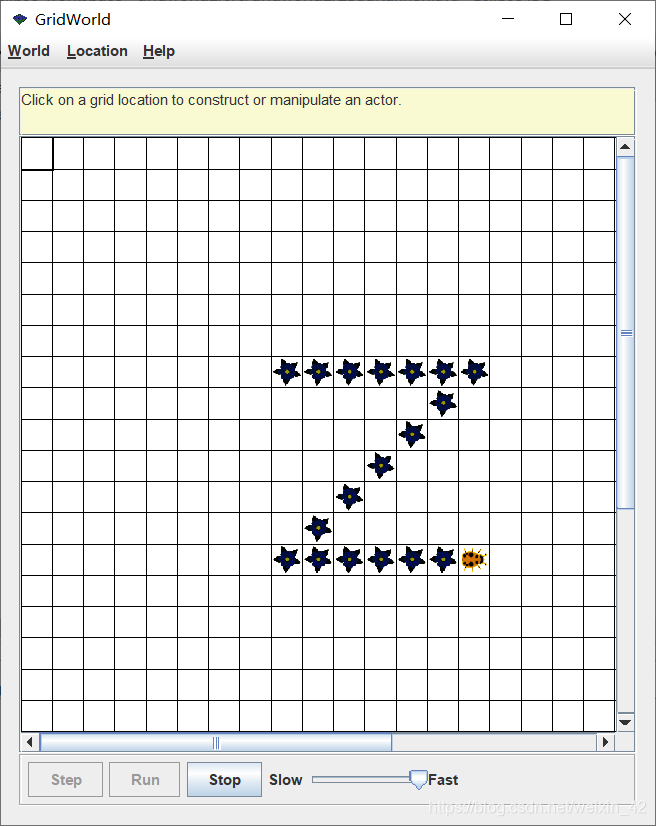
(3)ZBug
Write a class ZBug to implement bugs that move in a “Z” pattern, starting in the top left corner. After completing one “Z” pattern, a ZBug should stop moving. In any step, if a ZBug can’t move and is still attempting to complete its “Z” pattern, the ZBug does not move and should not turn to start a new side. Supply the length of the “Z” as a parameter in the constructor. The following image shows a “Z” pattern of length 4. Hint: Notice that a ZBug needs to be facing east before beginning its “Z” pattern.
(4)DancingBug
Write a class DancingBug that “dances” by making different turns before each move. The DancingBug constructor has an integer array as parameter. The integer entries in the array represent how many times the bug turns before it moves. For example, an array entry of 5 represents a turn of 225 degrees (recall one turn is 45 degrees). When a dancing bug acts, it should turn the number of times given by the current array entry, then act like a Bug. In the next move, it should use the next entry in the array. After carrying out the last turn in the array, it should start again with the initial array value so that the dancing bug continually repeats the same turning pattern. The DancingBugRunner class should create an array and pass it as aparameter to the DancingBug constructor.
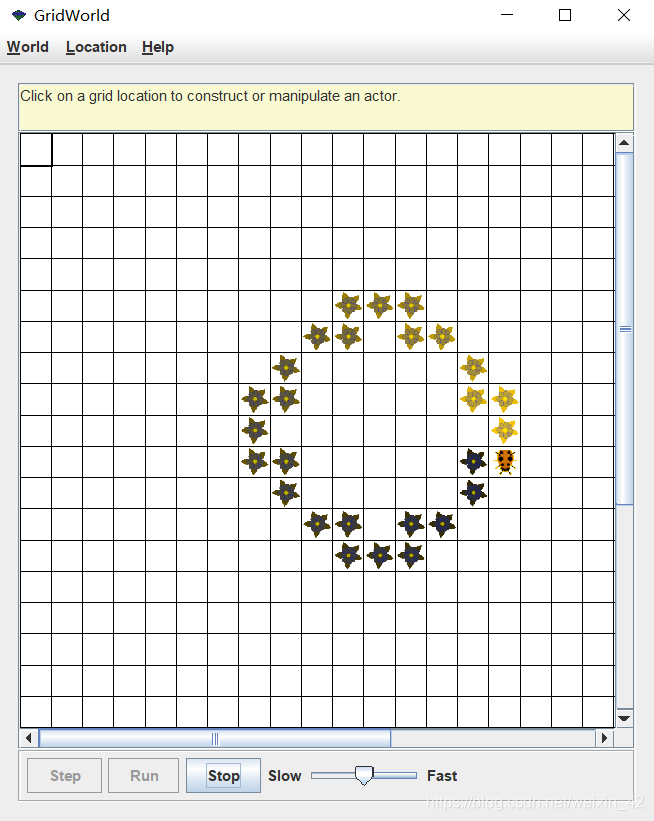
2. part3的工作
这部分我们要涉及一个jumper对象,其设计如下:
#### 1. What will a jumper do if the location in front of it is empty, but the location two cells in front contains a flower or a rock? **Answer:** ①If the location contains a flower, it will jump onto the flower without leaving a flower in the previous location. ②If the location contains a rock, it will turn 45 degrees to the right. #### 2. What will a jumper do if the location two cells in front of the jumper is out of the grid? **Answer:** ①If called by `jump()` method, it will remove the jumper as if it jumps out of the grid. ②If called by `act()` methods, it will turn 45 degrees to the right. #### 3. What will a jumper do if it is facing an edge of the grid? **Answer:** ①If called by `jump()` method, remove the jumper as if it jumps out of the grid. ②If called by `act()` methods, turn 45 degrees to the right. #### 4. What will a jumper do if another actor (not a flower or a rock) is in the cell that is two cells in front of the jumper? **Answer:** It will turn 45 degrees to the right. #### 5. What will a jumper do if it encounters another jumper in its path? **Answer:** ①If the location one cells in front of the jumper is another jumper, it will jump. ②If the location two cells in front of the jumper is another jumper, it will turn 45 degrees to the right. #### 6. Are there any other tests the jumper needs to make? **Answer:** When the jumper jump onto a flower, then it leaves, the flower will disappear. When the location in front of the jumper contains a bug, it can’t jump onto the bug.此外,我们还要编写单元测试来检测设计的正确性,此处笔者根据jumper的特性设计了19个单元测试(主要分为act()、jump()和 canJump()函数的测试):
For testing for Jumper, the main methods to be tested are act(), jump() and canJump(). According to the design report, I designed 9 tests for act(), 2 tests for jump(), and 8 tests for canJump().
1. Test for act()
(1)test jump over when the location one cells in front contains a rock
@Test public void testAct0() { //test jump over when the location one cells in front contains a rock world = new ActorWorld(); jumper = new Jumper(); world.add(new Location(5, 5), jumper); world.add(new Location(4, 5), new Rock()); world.step(); assertEquals(new Location(3, 5), jumper.getLocation()); }(2)test jump over when the location one cells in front contains a flower
@Test public void testAct1() { //test jump over when the location one cells in front contains a flower world = new ActorWorld(); jumper = new Jumper(); world.add(new Location(5, 5), jumper); world.add(new Location(4, 5), new Flower()); world.step(); assertEquals(new Location(3, 5), jumper.getLocation()); }(3)test turn when the location two cells in front contains a rock
@Test public void testAct2() { //test turn when the location two cells in front contains a rock world = new ActorWorld(); jumper = new Jumper(); world.add(new Location(5, 5), jumper); world.add(new Location(3, 5), new Rock()); world.step(); assertEquals(45, jumper.getDirection()); }(4)test jump when the location two cells in front contains a flower
@Test public void testAct3() { //test jump when the location two cells in front contains a flower world = new ActorWorld(); jumper = new Jumper(); world.add(new Location(5, 5), jumper); world.add(new Location(3, 5), new Flower()); world.step(); assertEquals(new Location(3, 5), jumper.getLocation()); }(5)test turn when the location two cells in front of the jumper is out of the grid
@Test public void testAct4() { //test turn when the location two cells in front of the jumper is out of the grid world = new ActorWorld(); jumper = new Jumper(); world.add(new Location(1, 5), jumper); world.step(); assertEquals(45, jumper.getDirection()); }(6)test turn when the the jumper is facing an edge of the grid
@Test public void testAct5() { //test turn when the the jumper is facing an edge of the grid world = new ActorWorld(); jumper = new Jumper(); world.add(new Location(0, 5), jumper); world.step(); assertEquals(45, jumper.getDirection()); }(7)test turn when another actor (not a flower or a rock) is in the cell that is two cells in front of the jumper
@Test public void testAct6() { //test turn when another actor (not a flower or a rock) is in the cell that is two cells in front of the jumper world = new ActorWorld(); jumper = new Jumper(); world.add(new Location(5, 5), jumper); world.add(new Location(3, 5), new Actor()); world.step(); assertEquals(45, jumper.getDirection()); }(8)test turn when jumper encounters another jumper in its path
@Test public void testAct7() { //test turn when jumper encounters another jumper in its path world = new ActorWorld(); jumper = new Jumper(); world.add(new Location(5, 5), jumper); Jumper jumper2 = new Jumper(); world.add(new Location(3, 5), jumper2); jumper2.setDirection(180); world.step(); assertEquals(45, jumper.getDirection()); assertEquals(225, jumper2.getDirection()); }(9)test no left flower when jumer leaves on a flower
@Test public void testAct8() { //test no left flower when jumer leaves on a flower world = new ActorWorld(); jumper = new Jumper(); world.add(new Location(5, 5), jumper); world.add(new Location(3, 5), new Flower()); world.step(); assertEquals(new Location(3, 5), jumper.getLocation()); world.step(); assertEquals(null, jumper.getGrid().get(new Location(3, 5))); }2. Test for jump()
(1)test remove when jumper is facing an edge of the grid
@Test public void testJump0() { //test remove when jumper is facing an edge of the grid world = new ActorWorld(); jumper = new Jumper(); world.add(new Location(0, 5), jumper); jumper.jump(); assertEquals(null, jumper.getGrid()); }(2)test remove when the location two cells in front of the jumper is out of the grid
@Test public void testJump1() { //test remove when the location two cells in front of the jumper is out of the grid world = new ActorWorld(); jumper = new Jumper(); world.add(new Location(1, 5), jumper); jumper.jump(); assertEquals(null, jumper.getGrid()); }3. Test for canJump()
(1)test true when jump over when the location one cells in front contains a rock
@Test public void testCanJump0() { //test true when jump over when the location one cells in front contains a rock world = new ActorWorld(); jumper = new Jumper(); world.add(new Location(5, 5), jumper); world.add(new Location(4, 5), new Rock()); assertEquals(true, jumper.canJump()); }(2)test true when jump over when the location one cells in front contains a flower
@Test public void testCanJump1() { //test true when jump over when the location one cells in front contains a flower world = new ActorWorld(); jumper = new Jumper(); world.add(new Location(5, 5), jumper); world.add(new Location(4, 5), new Flower()); assertEquals(true, jumper.canJump()); }(3)test false when the location two cells in front contains a rock
@Test public void testCanJump2() { //test false when the location two cells in front contains a rock world = new ActorWorld(); jumper = new Jumper(); world.add(new Location(5, 5), jumper); world.add(new Location(3, 5), new Rock()); assertEquals(false, jumper.canJump()); }(4)test true when the location two cells in front contains a flower
@Test public void testCanJump3() { //test true when the location two cells in front contains a flower world = new ActorWorld(); jumper = new Jumper(); world.add(new Location(5, 5), jumper); world.add(new Location(3, 5), new Flower()); assertEquals(true, jumper.canJump()); }(5)test false when the location two cells in front of the jumper is out of the grid
@Test public void testCanJump4() { //test false when the location two cells in front of the jumper is out of the grid world = new ActorWorld(); jumper = new Jumper(); world.add(new Location(1, 5), jumper); assertEquals(false, jumper.canJump()); }(6)test false when the the jumper is facing an edge of the grid
@Test public void testCanJump5() { //test false when the the jumper is facing an edge of the grid world = new ActorWorld(); jumper = new Jumper(); world.add(new Location(0, 5), jumper); assertEquals(false, jumper.canJump()); }(7)test false when another actor (not a flower or a rock) is in the cell that is two cells in front of the jumper
@Test public void testCanJump6() { //test false when another actor (not a flower or a rock) is in the cell that is two cells in front of the jumper world = new ActorWorld(); jumper = new Jumper(); world.add(new Location(5, 5), jumper); world.add(new Location(3, 5), new Actor()); assertEquals(false, jumper.canJump()); }(8)test false when encounters another jumper in its path
@Test public void testCanJump7() { //test false when encounters another jumper in its path world = new ActorWorld(); jumper = new Jumper(); world.add(new Location(5, 5), jumper); Jumper jumper2 = new Jumper(); world.add(new Location(3, 5), jumper2); jumper2.setDirection(180); assertEquals(false, jumper.canJump()); assertEquals(false, jumper2.canJump()); }4. Result
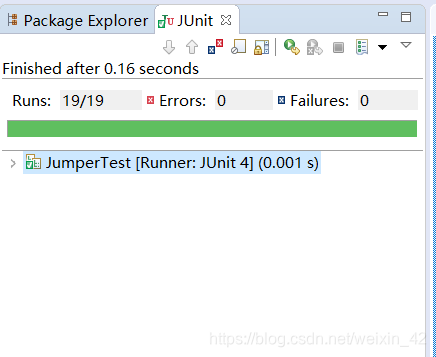
3. part4的工作
This project can be run using Eclipse. Its introduction and running screenshots are listed below. We can also use Sonar-Qube for code analysis of project files.
(1)ModifiedChameleonCritter
Modify the processActors method in ChameleonCritter so that if the list of actors to process is empty, the color of the ChameleonCritter will darken (like a flower).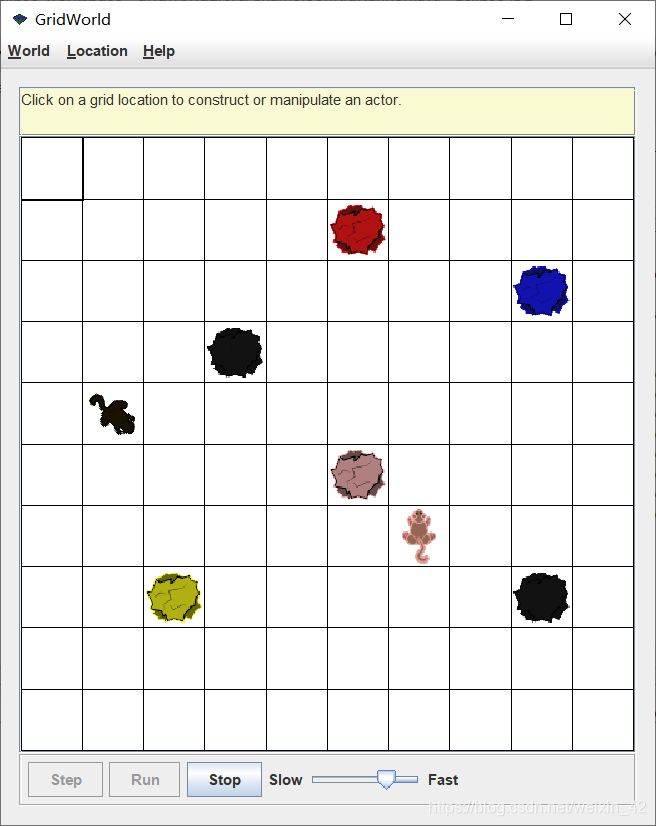
(2)ChameleonKid
Create a class called ChameleonKid that extends ChameleonCritter as modified in exercise 1. A ChameleonKid changes its color to the color of one of the actors immediately in front or behind. If there is no actor in either of these locations, then the ChameleonKid darkens like the modified ChameleonCritter.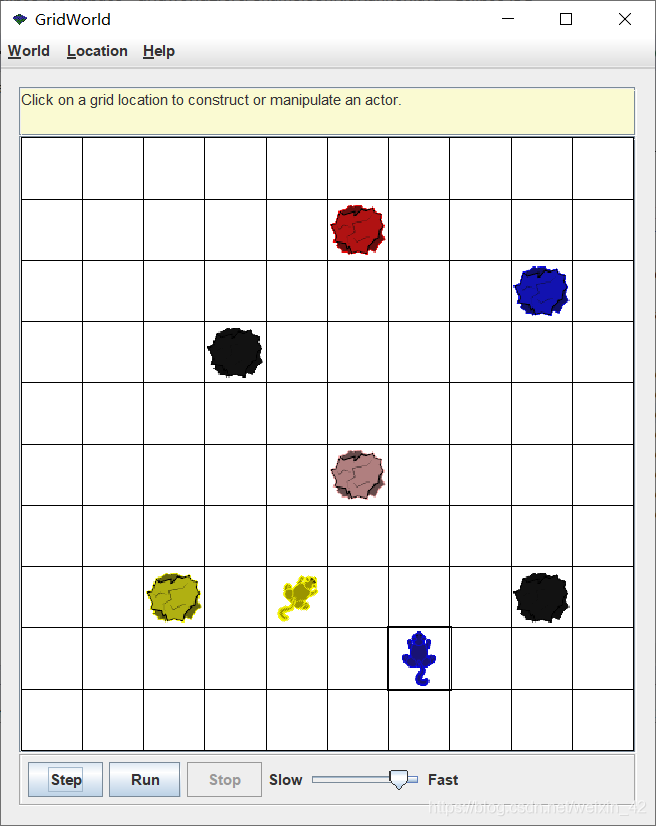
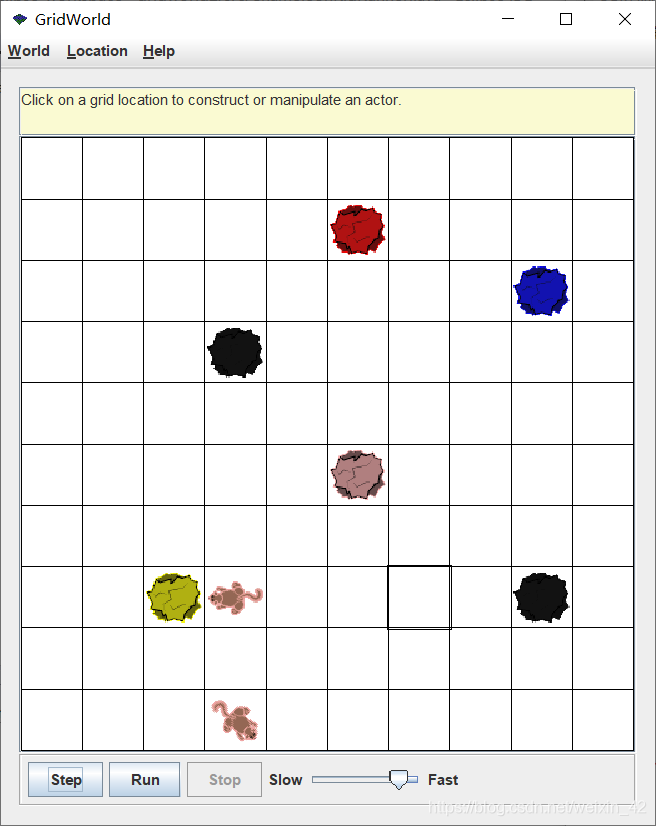
(3)RockHound
Create a class called RockHound that extends Critter. A RockHound gets the actors to be processed in the same way as a Critter. It removes any rocks in that list from the grid. A RockHound moves like a Critter.
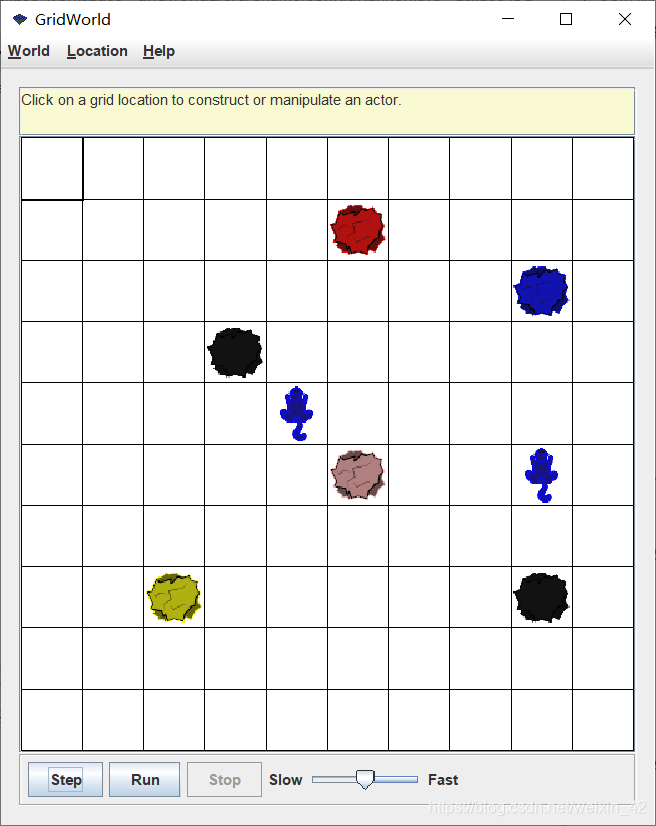
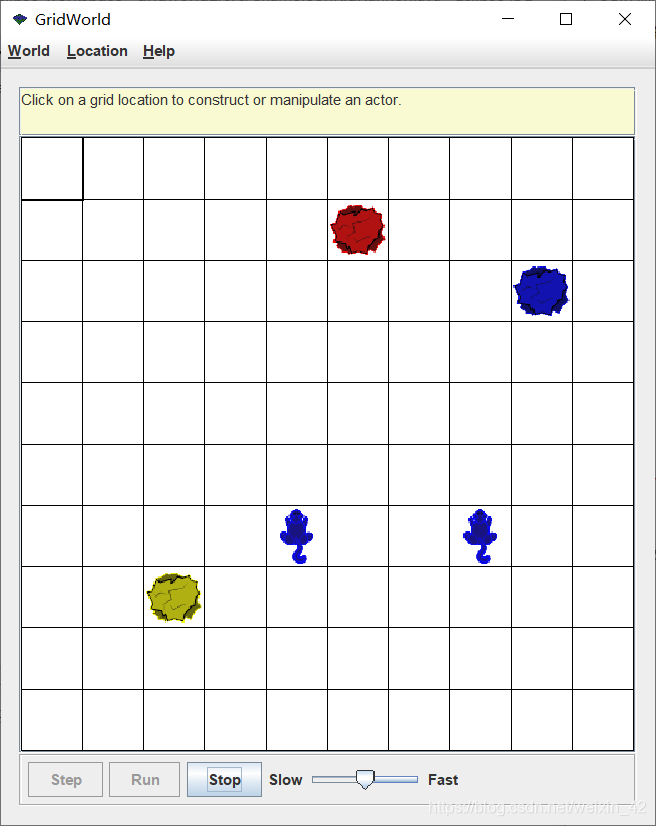
(4)BlusterCritter
Create a class BlusterCritter that extends Critter. A BlusterCritter looks at all of the neighbors within two steps of its current location. (For a BlusterCritter not near an edge, this includes 24 locations). It counts the number of critters in those locations. If there are fewer than c critters, the BlusterCritter’s color gets brighter (color values increase). If there are c or more critters, the BlusterCritter’s color darkens (color values decrease). Here, c is a value that indicates the courage of the critter. It should be set in the constructor.
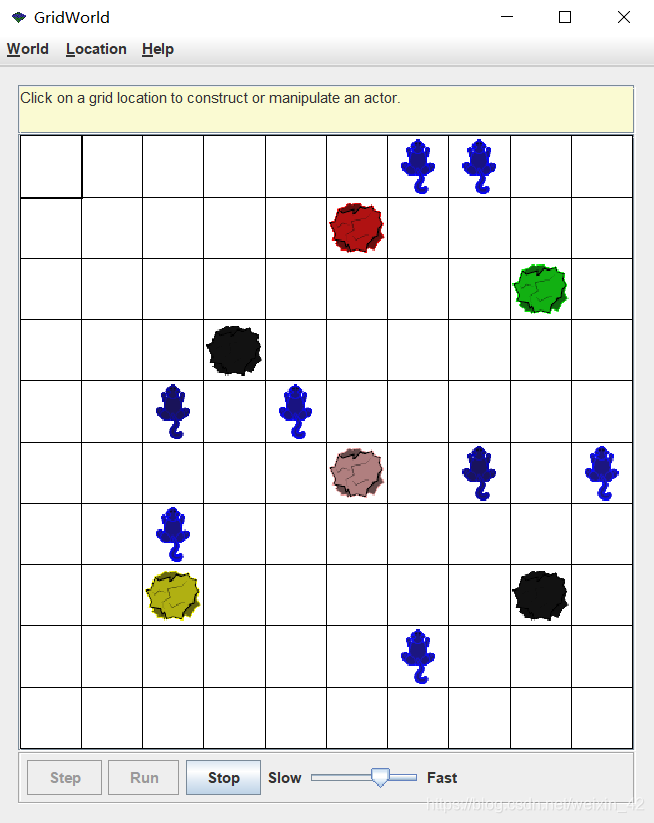
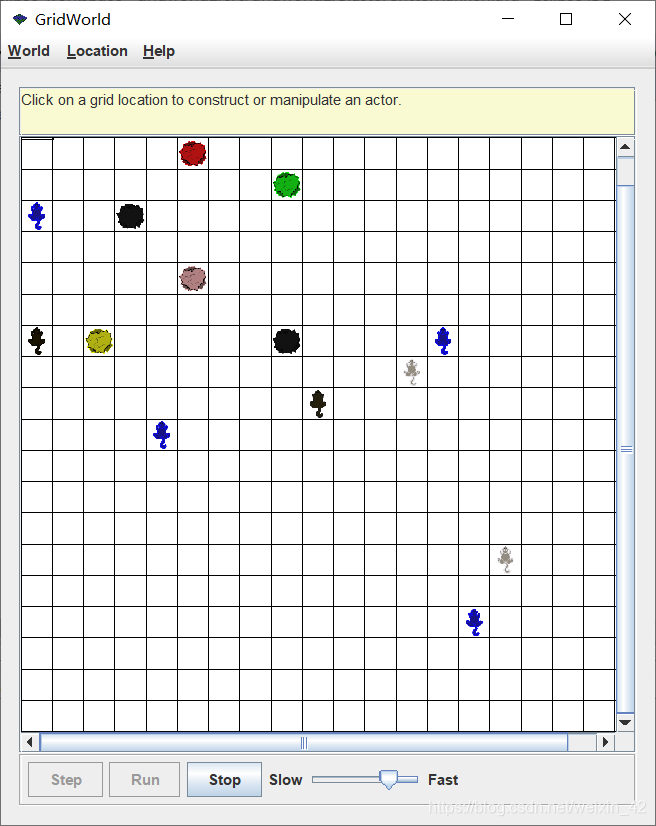
(5)
Create a class that extends CrabCritter. A processes actors the same way a CrabCritter does. A moves to one of the two locations, randomly selected, that are two spaces to its right or left, if that location and the intervening location are both empty. Otherwise, a moves like a CrabCritter.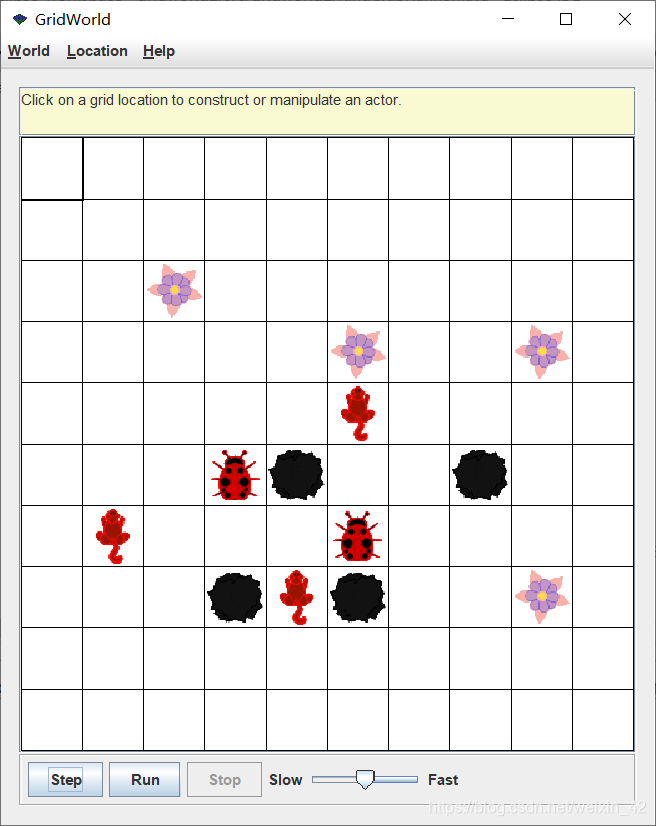
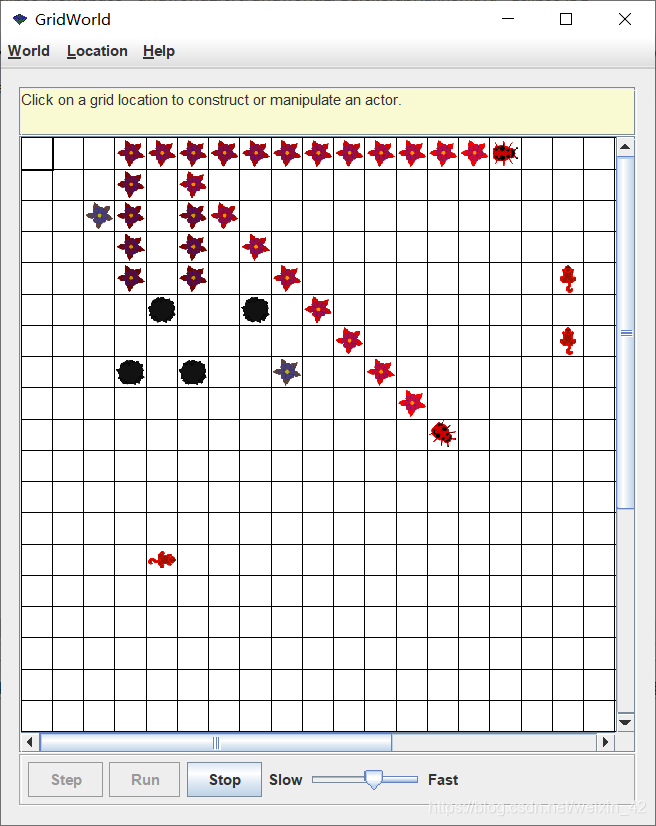
(6)KingCrab
Create a class KingCrab that extends CrabCritter. A KingCrab gets the actors to be processed in the same way a CrabCritter does. A KingCrab causes each actor that it processes to move one location further away from the KingCrab. If the actor cannot move away, the KingCrab removes it from the grid. When the KingCrab has completed processing the actors, it moves like a CrabCritter.
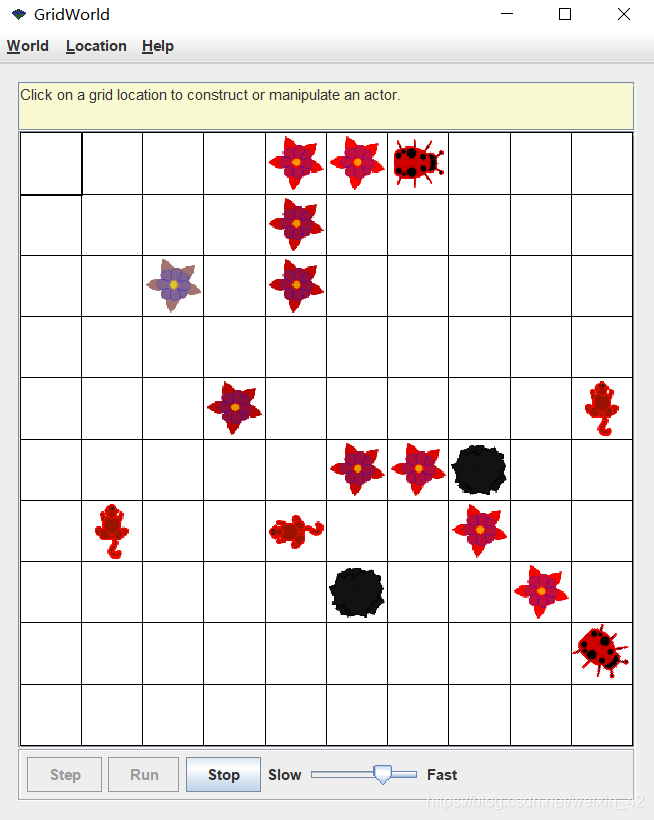
4. part5的工作
This project can be run using Eclipse. Its introduction and running screenshots are listed below. We can also use Sonar-Qube for code analysis of project files.
(1)SparseGridNode
A SparseGridNode is a basic node in the grid, namely a small lattice.
(2)SparseBoundedGrid
A SparseBoundedGrid is a rectangular grid with bounded edges and sparse objects in the gird implemented by sparse array.
(3)SparseBoundedGrid2
A SparseBoundedGrid2 is a rectangular grid with bounded edges and sparse objects in the gird implemented by HashMap.
(4)UnboundedGrid2
An UnboundedGrid is a rectangular grid with unbounded number of rows and columns. When the access exceeds the current size, its size will be doubled.
(5)SparseGridRunner
This class runs a world with additional grid choices. We can use the SparseBoundedGrid, SparseBoundedGrid2 or UnboundedGrid2 methods to build a grid world.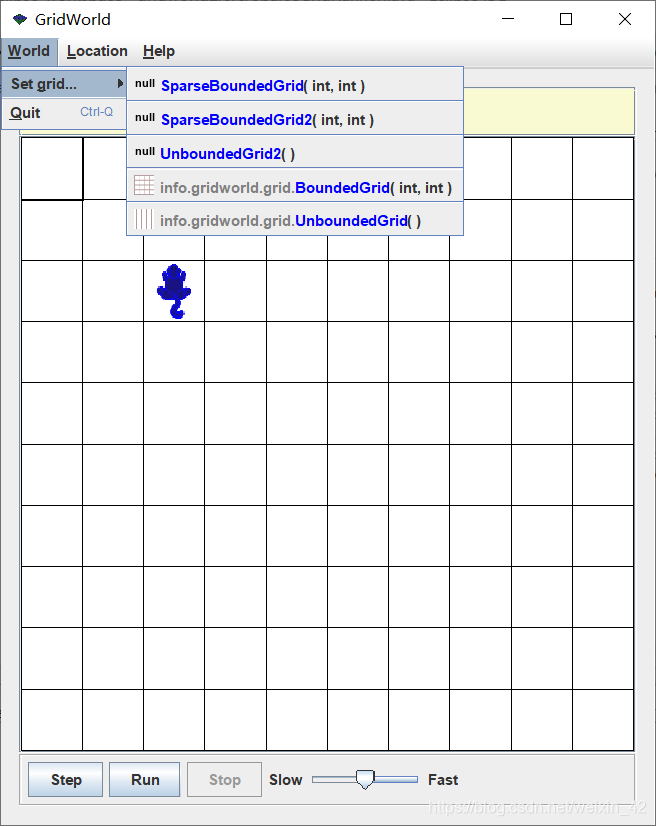
三、阶段3:扩展任务
阶段3的扩展任务分为imagereader、mazebug和jigsaw,这三者毫无疑问是整个中级实训最难的一部分,其中主要的难点在于理解任务与框架,java的编程实现也比阶段2按模板“填鸭式”的编程要难上许多。
但好在各个part都至少有一个现成的示例和详细的设计框架,比如mazebug给出了编程的全过程和灰度图的算法,只差实现了;mazebug给出了深度优先搜索的思路,然后自己在这基础上再完成一个方向预测的小设计即可顺利完成;jigsaw给出了启发式搜索算法的代码,我们只需要借鉴实现广度优先搜索和设计启发式搜索算法的cost函数即可。
由于阶段3也完善了readme文件,此处笔者简单总结各个任务的核心算法,并结合readme文件进行介绍如下:
1. imagereader的工作
在实训的博客中,介绍了位图文件的存储结构,为了提取主要的像素色彩信息,我们需要从位图中将它们分离出来:
class ImplementImageIO implements IImageIO{ /* * 利用二进制流读取Bitmap位图文件 * 注意,这里要求不能使用Java提供的API直接读取图像 * IImageIO必须实现myRead函数 */ public Image myRead(String filepath) throws IOException { try { FileInputStream imageStream = new FileInputStream(filepath); /* * 丢弃无用信息 * #18-21 保存位图宽度(以像素个数表示) * #22-25 保存位图高度(以像素个数表示) */ imageStream.skip(18); byte[] widthByte = new byte[4]; imageStream.read(widthByte); byte[] heightByte = new byte[4]; imageStream.read(heightByte); int width = byte2Int(widthByte); int height = byte2Int(heightByte); int[] data = new int[width * height]; /* * 丢弃无用信息 * #54-x 位图数据 */ imageStream.skip(28); int skipNum = (4 - width * 3 % 4) % 4; for(int i = height - 1; i >= 0; --i) { for(int j = 0; j e.printStackTrace(); return null; } //return null; } public int byte2Int(byte[] tmp) { int t1 = tmp[3] & 0xff; int t2 = tmp[2] & 0xff; int t3 = tmp[1] & 0xff; int t4 = tmp[0] & 0xff; int num = t1 e.printStackTrace(); } return null; } }此外,实训博客也有一个比较有趣的任务,就是输入色彩图,转换为红蓝绿灰图,由于博客中已给出了红蓝绿图和灰度图的公式(见下面代码的注释),其核心算法即图像处理算法的实现也比较简单:
class ImplementImageProcessor implements IImageProcessor { public Image showGray(Image image) { try { return colorFilter(image, "gray"); } catch (Exception e) { e.printStackTrace(); } return null; } public Image showChanelB(Image image) { try { return colorFilter(image, "blue"); } catch (Exception e) { e.printStackTrace(); } return null; } public Image showChanelG(Image image) { try { return colorFilter(image, "green"); } catch (Exception e) { e.printStackTrace(); } return null; } public Image showChanelR(Image image) { try { return colorFilter(image, "red"); } catch (Exception e) { e.printStackTrace(); } return null; } private Image colorFilter(Image img, String color) { BufferedImage newImage = new BufferedImage(img.getWidth(null), img.getHeight(null), BufferedImage.TYPE_INT_RGB); Graphics2D graph = newImage.createGraphics(); graph.drawImage(img, 0, 0, null); graph.dispose(); int width = img.getWidth(null); int height = img.getHeight(null); for(int i = 0; i int rgb = newImage.getRGB(i, j); if(color == "red") { rgb = 0xffff0000 & rgb; } else if(color == "green") { rgb = 0xff00ff00 & rgb; } else if(color == "blue") { rgb = 0xff0000ff & rgb; } else { /* * 彩色图像转换成灰度图像 *将彩色图转换成灰度图,建议采用NTSC推荐的彩色图到灰度图的转换公式: *I = 0.299 * R + 0.587 * G + 0.114 *B,其中R,G,B分别为红、绿、蓝通道的颜色值。 *然后将三个色彩通道的颜色值改为这个值即可。这样,原来的彩色图像就变成了灰度图像了。 */ int gray = (int)(((rgb & 0x00ff0000) >> 16) * 0.299 + ((rgb & 0x0000ff00) >> 8) * 0.587 + (rgb & 0x000000ff) * 0.114); rgb = (rgb & 0xff000000) + (gray setColor(Color.GREEN); last = new Location(0, 0); /* * initialize property */ visit = new boolean[100][100]; for(int i=0;i visit[i][j]=false; } } Location loc = getLocation(); branch = new ArrayList(); branch.add(loc); /* * 四个方向选择次数默认都是1,如果第一个节点选择向左,则向左次数加1,注意思考什么时候次数需要减少。 */ weight = new int[4]; for(int i=0;i boolean willMove = canMove(); if (isEnd == true) { //to show step count when reach the goal if (hasShown == false) { String msg = stepCount.toString() + " steps"; JOptionPane.showMessageDialog(null, msg); hasShown = true; } } else if (willMove) { visit[next.getRow()][next.getCol()]=true; move(); //increase step count when move stepCount++; } else { if(branch.isEmpty()){ branch = crossLocation.pop(); Location loc=branch.get(branch.size()-1); int dir=getLocation().getDirectionToward(loc); /* * 四个方向选择次数默认都是1,如果第一个节点选择向左,则向左次数加1 * 注意思考什么时候次数需要减少。 * 回溯的时候次数减1 */ if(dir==Location.NORTH){ weight[2]--; } else if(dir==Location.EAST){ weight[1]--; } else if(dir==Location.SOUTH){ weight[3]--; } else if(dir==Location.WEST){ weight[0]--; } } next = branch.remove(branch.size()-1); move(); stepCount++; } } /** * Find all positions that can be move to. * * @param loc * the location to detect. * @return List of positions. */ public ArrayList getValid(Location loc) { Grid gr = getGrid(); if (gr == null){ return null; } ArrayList valid = new ArrayList(); /* * 虫子的行走方向只有东南西北四个方向, * 且在碰到迷宫出口(红石头)时,虫子会自动停下来。 */ int[] direction ={ Location.NORTH, Location.WEST, Location.EAST, Location.SOUTH }; for(int d:direction){ Location neighbor= loc.getAdjacentLocation(getDirection() + d); if(gr.isValid(neighbor)){ Actor a = gr.get(neighbor); if((a==null||a instanceof Flower)&&!visit[neighbor.getRow()][neighbor.getCol()]){ valid.add(neighbor); } else if(a instanceof Rock){ if(Color.RED.equals(a.getColor())){ isEnd = true; } } } } return valid; } /* * 增加方向的概率估计。五个评估成绩的迷宫都有一定的方向偏向性,如图四就有向上和向左的偏向性。 * 在行走正确路径时,对四个方向的选择次数进行统计,从而控制随机选择时选择某个方向的概率。增加方向的概率估计后能有效地提高走迷宫的效率。 * 提示:四个方向选择次数默认都是1,如果第一个节点选择向左,则向左次数加1,注意思考什么时候次数需要减少。 */ public Location directionPrediction(ArrayList locs){ int dir=0; int westWeight=0,eastWeight=0,northWeight=0,southWeight=0; for(Location loc:locs){ dir=getLocation().getDirectionToward(loc); if(dir==Location.NORTH){ northWeight=weight[2]; } else if(dir==Location.EAST){ eastWeight=weight[1]; } else if(dir==Location.SOUTH){ southWeight=weight[3]; } else if(dir==Location.WEST){ westWeight=weight[0]; } } int random= 1 + (int)(Math.random() * (westWeight + eastWeight + northWeight + southWeight)); if (random dir = Location.EAST; weight[1]++; } else if (random dir =Location.SOUTH; weight[3]++; } Location next=null; for(Location loc:locs){ if(dir==getLocation().getDirectionToward(loc)){ next=loc; } } return next; } /** * Tests whether this bug can move forward into a location that is empty or * contains a flower. * * @return true if this bug can move. */ public boolean canMove() { ArrayList locs=getValid(getLocation()); if(locs.isEmpty()){ return false; } else{ branch.add(getLocation()); if(locs.size()>1){ crossLocation.push(branch); branch = new ArrayList(); next = directionPrediction(locs); } else{ next=locs.get(0); } last = getLocation(); } return true; } /** * Moves the bug forward, putting a flower into the location it previously * occupied. */ /* * 选择行走方向可以使用java的随机数类Random。 * 要注意什么时候该入栈,什么时候该出栈。 * 存储一个节点时,注意除了存储”该节点位置”和”已访问方向”外,还要存储”进入节点的方向”,以便在前路不通时能成功返回。 */ public void move() { Grid gr = getGrid(); if (gr == null){ return; } Location loc = getLocation(); if (gr.isValid(next)) { setDirection(getLocation().getDirectionToward(next)); moveTo(next); } else{ removeSelfFromGrid(); } Flower flower = new Flower(getColor()); flower.putSelfInGrid(gr, loc); } }4. mazebug的readme文件
This project can be run using Eclipse. Its introduction and running screenshots are listed below. We can also use Sonar-Qube for code analysis of project files.
The overall structure of the project is as follows:
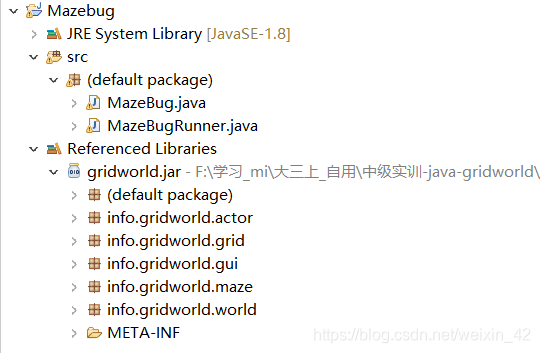
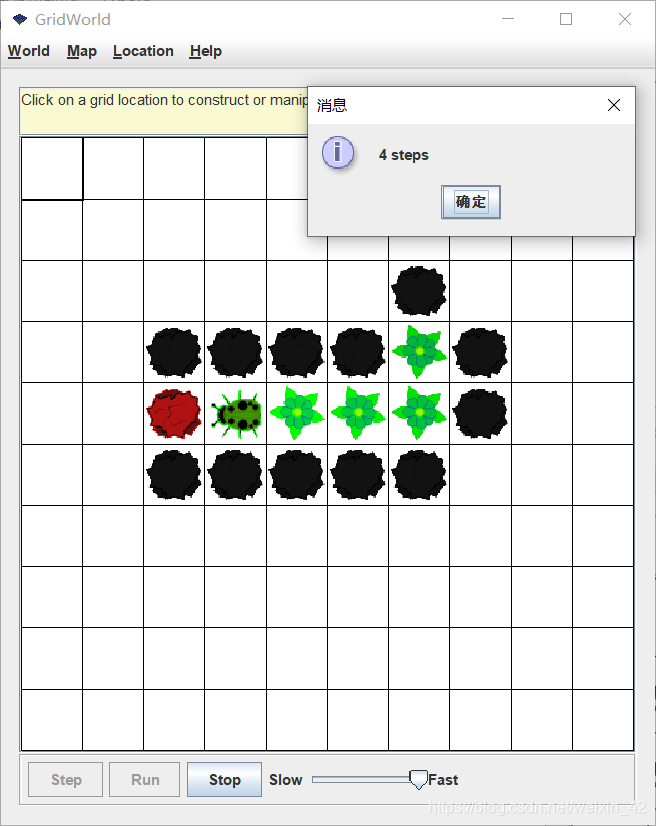
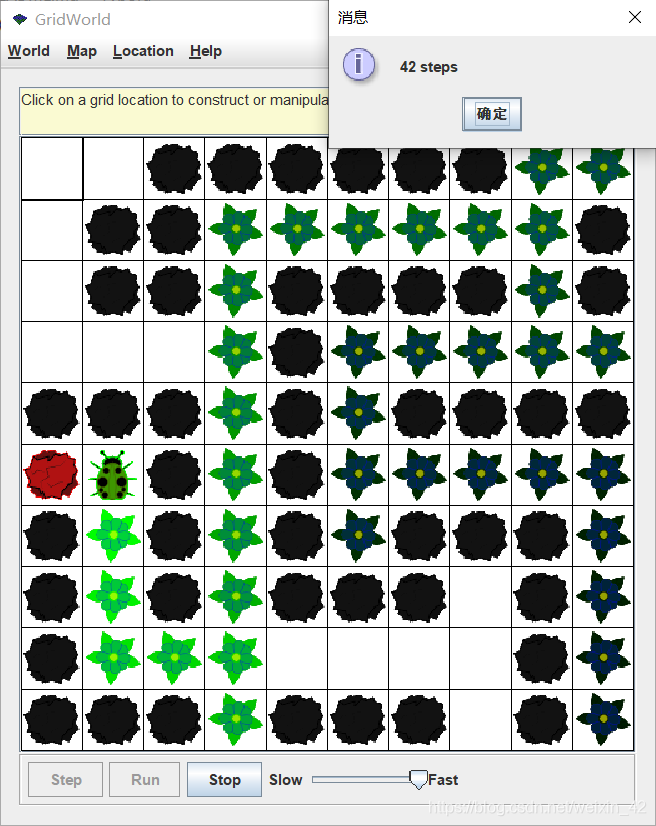
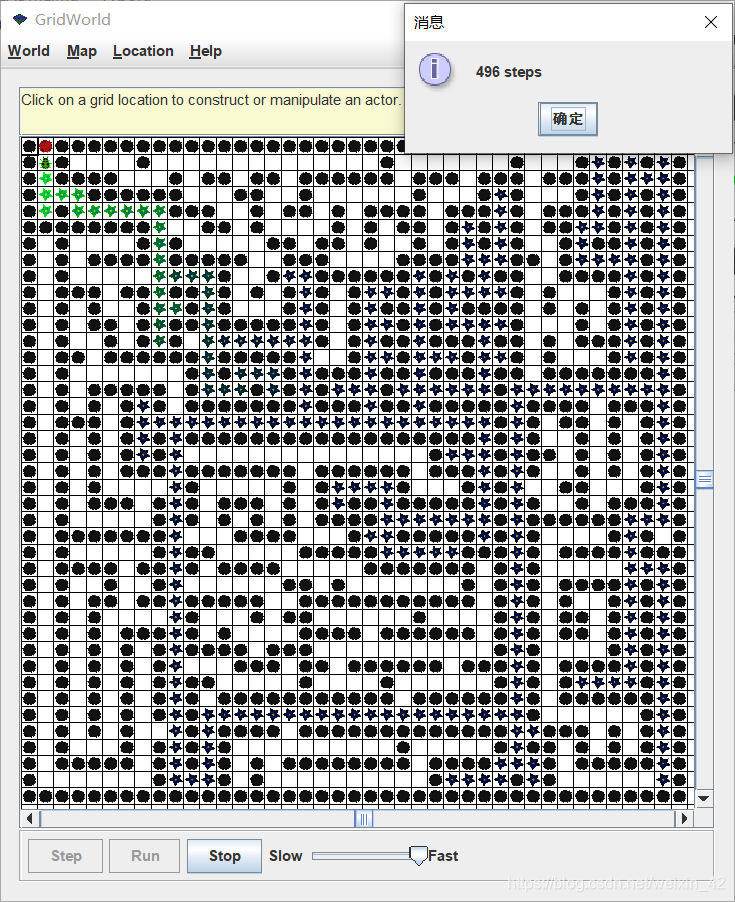
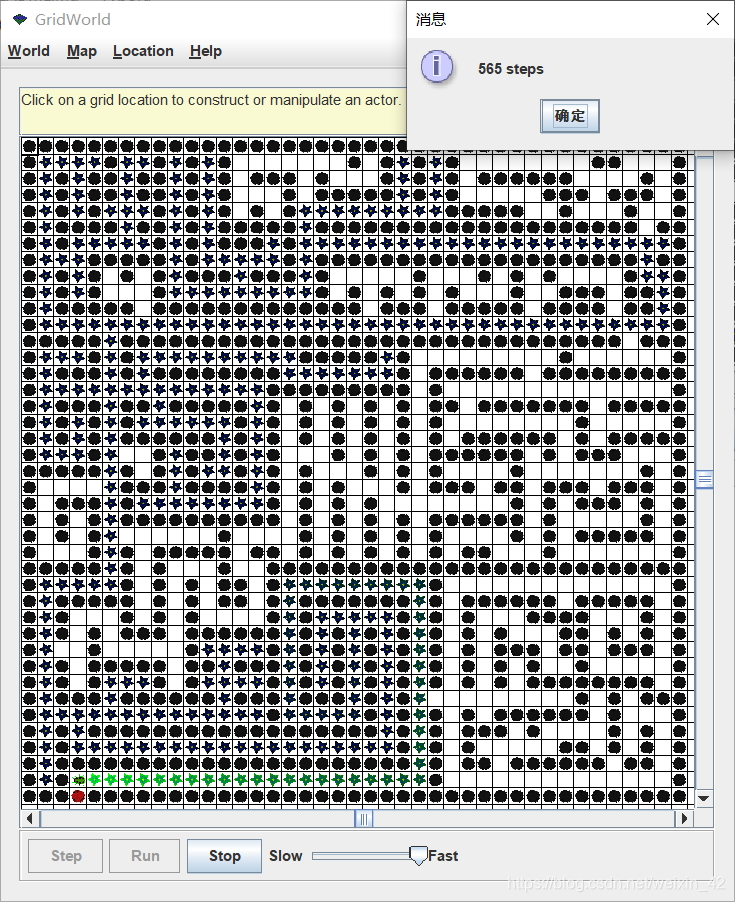
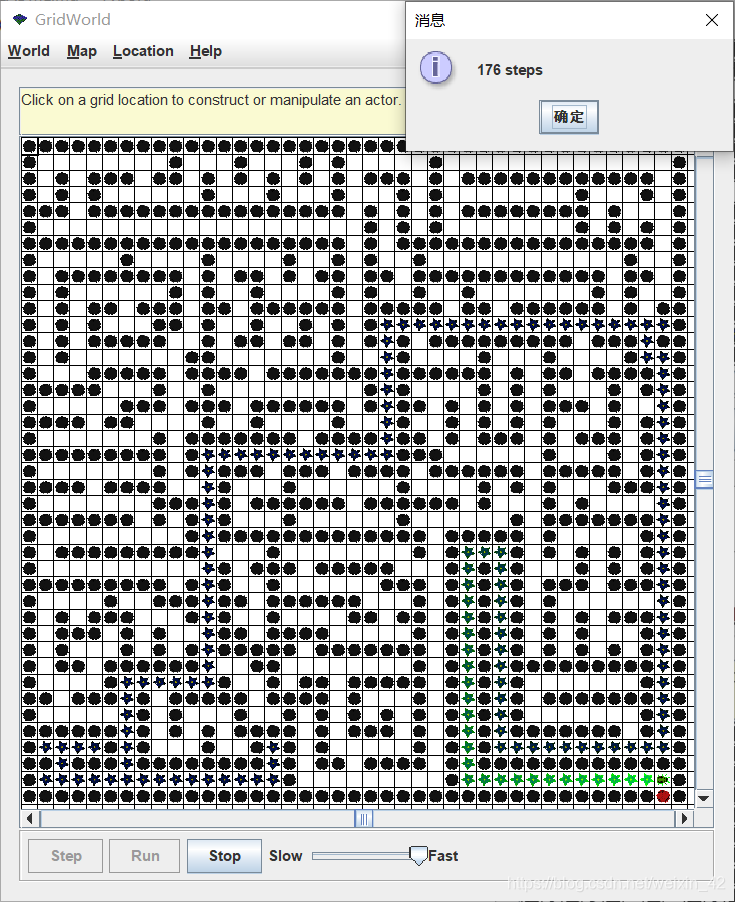
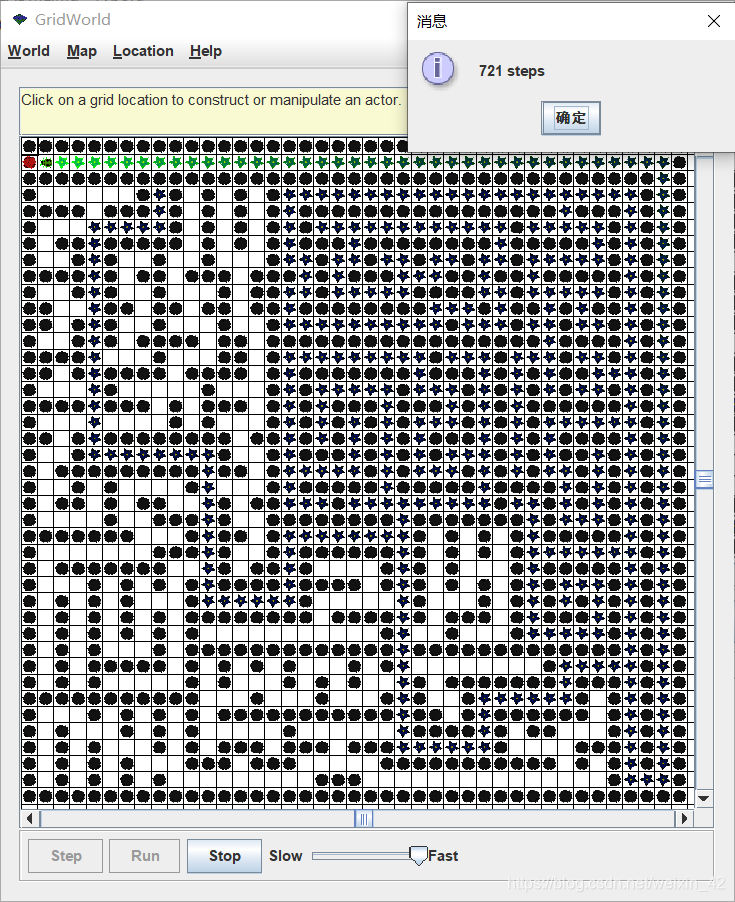
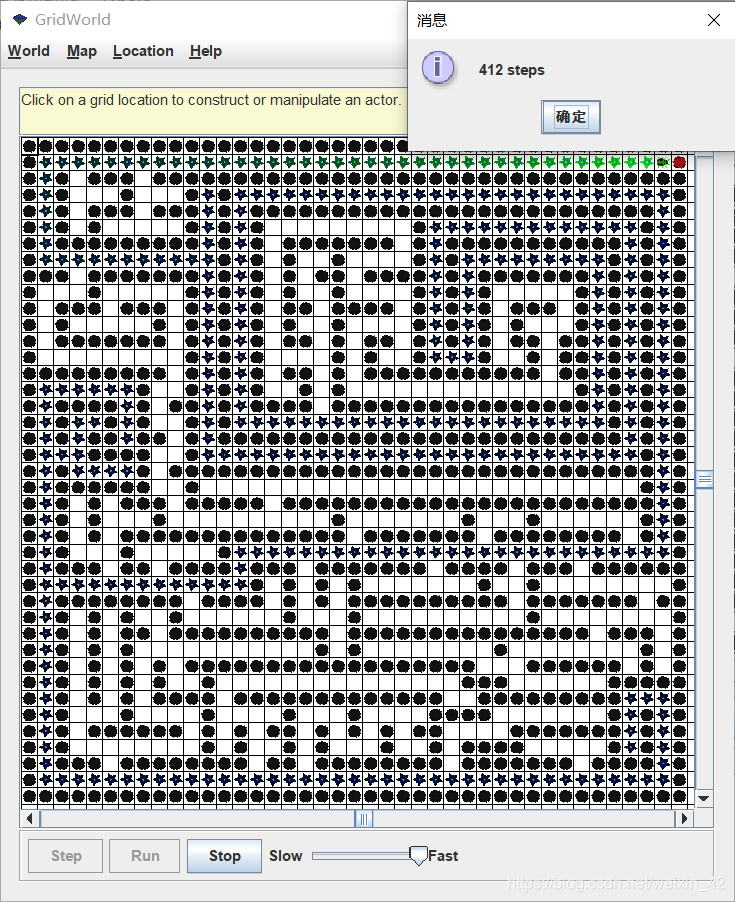
(1)MazeBugRunner.java
This Java file is the entry to the program. Running this file calls the ActorWorld methods.
In GridWorld, we can set the grid size and load the maze. And then, we can use the depth-first algorithm to get out of the maze.
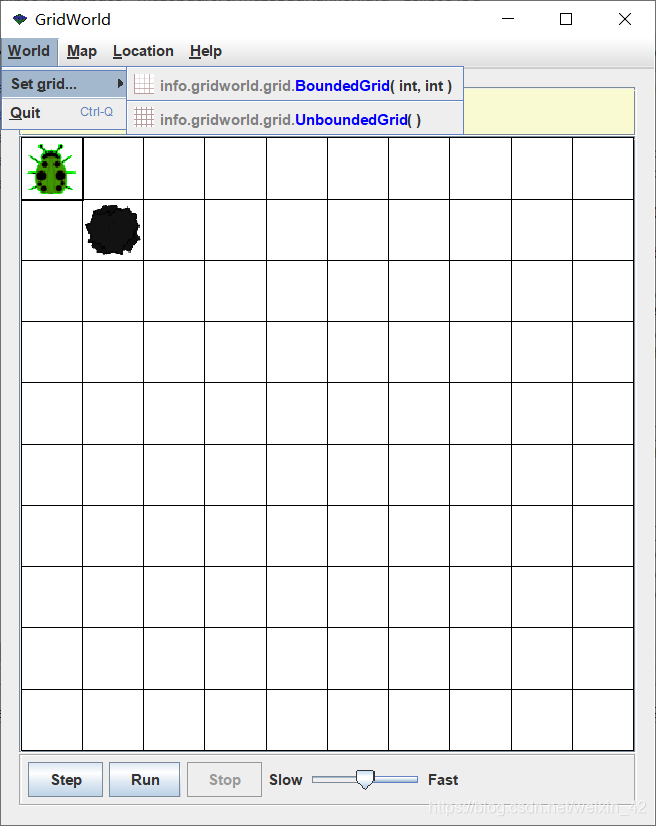
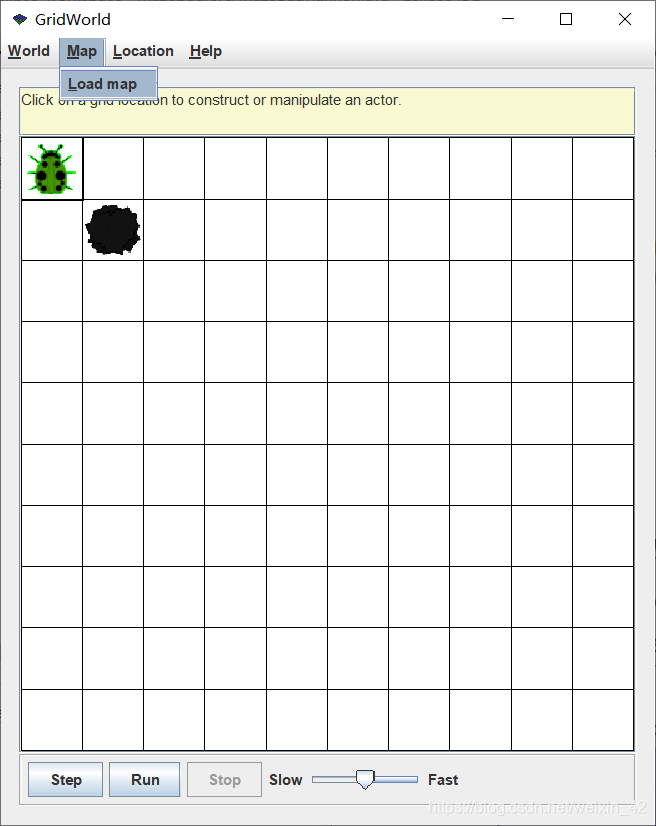
(2)MazeBug.java
This file realizes the method of getting out of the maze based on depth first search and direction probability estimation.
(3)Examples
OneRoadMaze:
EasyMaze:
FinalMaze01:
FinalMaze02:
FinalMaze03;
FinalMaze04:
FinalMaze05;
5. jigsaw的工作
jigsaw(N-Puzzle)是笔者认为整个中级实训最好玩的一个任务,笔者以外地发现可以在这个小项目中进行一些“炼丹工作者”的fine-tune操作。
笔者先根据要求在启发式搜索算法的框架下,完成了简单的广度优先算法:
然后便是为启发式搜索算法完善估价函数,在实训博客中有如下定义:
估价函数f(n)用来估计节点n的重要性,表示为:从起始节点,经过节点n,到达目标节点的代价。f(n)越小,表示节点n越优良,应该优先访问它的邻接节点。可参考的估价方法有:
①所有 放错位的数码 个数
②所有 放错位的数码与其正确位置的距离 之和
③后续节点不正确的数码个数
……
可以同时使用多个估价方法,f(n) = af1(n) + bf2(n) + … 通过适当调整权重(a,b,…),能够加快搜索速度。
在博客的基础上,笔者一共实现了四种估价参数,并通过手动设置不同的权值来进行fine-tune操作(下面代码中的参数是手动测试得到的局部最优值):
/** *(Demo+实验二)计算并修改状态节点jNode的代价估计值:f(n) * 如 f(n) = s(n). s(n)代表后续节点不正确的数码个数 * 此函数会改变该节点的estimatedValue属性值 * 修改此函数,可在Solution类中添加其他函数,属性 * @param jNode - 要计算代价估计值的节点 */ public void estimateValue(JigsawNode jNode) { /* * four cost */ int s = 0; int misplacedTiles = 0; int manHattan = 0; int euclidean = 0; int dimension = JigsawNode.getDimension(); /* * 1st cost: 后续节点不正确的个数 */ for (int index = 1; index s++; } } /* * 2nd cost: 所有放错位的数码个数 */ for(int index = 1; index if (jNode.getNodesState()[i] != 0) { for (int j = 1; j int startX = (i - 1) / dimension; int startY = (i - 1) % dimension; int endX = (j - 1) / dimension; int endY = (j - 1) % dimension; manHattan += Math.abs(startX - endX) + Math.abs(startY - endY); euclidean += Math.pow(startX - endX, 2) + Math.pow(startY - endY, 2); break; } } } } //fine-tune to set the locally optimal weights jNode.setEstimatedValue(8 * s + 4 * manHattan + 2 * euclidean + 1 * misplacedTiles); }在笔者愉快的调参过程中,笔者经过多次测试调优后,发现该项目的最高得分score为7,最低得分score为3(权值均为0),调参过程果然还是挺有趣的~
四、总结和心得体会
在本次中级实训临近结束时,不禁感慨个人的实力还是有限的,一个人不可能在0经验的情况下无师自通,还是得多多学习和多多请教。
与大一的初级实现相比,中级实训的代码量看似多了不少,但实际上难度应该不在于代码的编写,而在于项目框架的理解,在掌握了基本的工具与框架之后,代码的编写简直是如鱼得水。但与此同时,每个阶段的问答题,还是让我耗费了更多的精力,当然也因此认识到自己项目开发的不足,比如考虑问题的角度不够细致,单元测试有所缺陷,上交TA检查代码前没有做好充足的准备而突发BUG等等。这些都让我对软件开发流程有了更深刻的理解。
在整个中级实训过程中,我最喜欢的是扩展任务部分,这让我有一种真正学到一些有趣的知识的感觉,而不用像基本任务那样“填鸭式”地完成编程任务。当然,这也有可能是因为不需要像之前那样对着代码完成问答题。但总而言之,在扩展任务部分进行飞马行空的编程,写写DFS和BFS,写写方向预测和进行快乐的调参,这些经历都是不可多得的。
最后,这次实训总结得到了很多人的帮助,如TA、舍友和往届师兄师姐等,希望这篇略长的实训总结报告,能为往后的师弟师妹们献上一分薄力。
谢谢坚持完成中级实训任务的自己,日后还请多多加油。
上一篇:java实训报告
下一篇:java实训报告简单
知识阅读






软件推荐
更多 >-
 查看
查看皓盘云建最新版下载v9.0 安卓版
53.38MB |商务办公
-
 查看
查看ris云客移动销售系统最新版下载v1.1.25 安卓手机版
42.71M |商务办公
-
 查看
查看粤语翻译帮app下载v1.1.1 安卓版
60.01MB |生活服务
-
 查看
查看人生笔记app官方版下载v1.19.4 安卓版
125.88MB |系统工具
-
 查看
查看萝卜笔记app下载v1.1.6 安卓版
46.29MB |生活服务
-
 查看
查看贯联商户端app下载v6.1.8 安卓版
12.54MB |商务办公
-
 查看
查看jotmo笔记app下载v2.30.0 安卓版
50.06MB |系统工具
-
 查看
查看鑫钜出行共享汽车app下载v1.5.2
44.7M |生活服务
精选栏目
热门推荐



-
1
 联想拯救者R7000 2020款清灰教程及对硅脂or导热垫选择参考建议
2022-03-26
-
2
 联想笔记本电脑清理灰尘详细步骤
2022-03-26
-
3
 神舟bios设置图解教程
2022-03-26
-
4
 192.168.1.62登录入口管理网址
2022-03-26
-
5
 ACPI是什么?BIOS中怎么设置ACPI?
2022-03-26
-
6
 联想ThinkPad笔记本win10改win7系统及BIOS设置图文教程
2022-03-26
-
7
 联想ThinkPad笔记本装win10系统及bios设置教程(附带分区教程)
2022-03-26
-
8
 鸿蒙系统能安装vscode吗
2022-03-26
-
9
 fast路由器设置网址192.168.1.1,falogin.cn密码
2022-02-15
-
10
 联想笔记本装系统怎么进入PE图文教程
2022-02-14







-
1

-
2
机器人战斗竞技场手机版下载v3.71 安卓版
其它手游 -
3
果冻人大乱斗最新版下载v1.1.0 安卓版
其它手游 -
4
王者100刀最新版下载v1.2 安卓版
其它手游 -
5
trueskate真实滑板正版下载v1.5.102 安卓版
其它手游 -
6
矢量跑酷2最新版下载v1.2.1 安卓版
其它手游 -
7
休闲解压合集下载v1.0.0 安卓版
其它手游 -
8
指尖游戏大师最新版下载v4.0.0 安卓版
其它手游 -
9
飞天萌猫下载v3.0.3 安卓版
其它手游 -
10
火柴人越狱大逃脱下载v1.1 安卓版
其它手游